Disk Management
Virtual Disks
In the detail view of the Virtual Machine, in the Devices > Virtual Disk Drives tab, you can manage additional Virtual Disks.
Deleting an existing Virtual Disk can result in data loss.
All data must be migrated before deleting the Virtual Disk.
Linux
Logical Volume Manager
The Logical Volume Manager (LVM) has been an important part of every Linux system administrator's toolkit for years. It enables simple structuring and management of system partitions and offers more flexibility compared to conventional partition management.
In the following example, two Logical Volumes will be created and expanded on the additional Virtual Disks. Each Virtual Disk has 100GB of free storage space. The Logical Volumes will be distributed across both Virtual Disks.
[user@demo ~]$ sudo lsblk
NAME                     MAJ:MIN RM  SIZE RO TYPE MOUNTPOINTS
sdb                        8:16   0  100G  0 disk
├─vgdemo-lvapp           253:10   0  100G  0 lvm
└─vgdemo-lvdata          253:11   0  150G  0 lvm
sdc                        8:16   0  100G  0 disk
└─vgdemo-lvdata          253:11   0  150G  0 lvm
Reading Virtual Disk
Before you create a Volume Group, you need the block device. You can read the Virtual Disk with a simple command. lsblk (List Block devices) displays all available block devices in a tree structure.
[user@demo ~]$ sudo lsblk
NAME                     MAJ:MIN RM  SIZE RO TYPE MOUNTPOINTS
sda                        8:0    0   80G  0 disk
├─sda1                     8:1    0  200M  0 part /boot/efi
├─sda2                     8:2    0    1G  0 part /boot
└─sda3                     8:3    0 78.8G  0 part
  ├─vgroot-lvroot        253:0    0   10G  0 lvm  /
  ├─vgroot-lvswap        253:1    0    8G  0 lvm  [SWAP]
  ├─vgroot-lvusr         253:2    0   10G  0 lvm  /usr
  ├─vgroot-lvopt         253:3    0    8G  0 lvm  /opt
  ├─vgroot-lvtmp         253:4    0    5G  0 lvm  /tmp
  ├─vgroot-lvvartmp      253:5    0   10G  0 lvm  /var/tmp
  ├─vgroot-lvvarlogaudit 253:6    0    1G  0 lvm  /var/log/audit
  ├─vgroot-lvvarlog      253:7    0    5G  0 lvm  /var/log
  ├─vgroot-lvvar         253:8    0   10G  0 lvm  /var
  └─vgroot-lvhome        253:9    0    5G  0 lvm  /home
sdb                        8:16   0  100G  0 disk
Each SCSI device follows a predefined naming scheme. The last letter is incremented alphabetically.
The order of block devices can vary during the boot process. It is therefore important not to mount Logical Volumes using device paths (/dev/sdb). For more information, see the section Persistent mounting.
Creating Volume Group
In this example, the new Virtual Disk is recognized as SCSI device sdb. You create the Volume Group with the following command.
[user@demo ~]$ sudo vgcreate vgdemo /dev/sdb
  Physical volume "/dev/sdb" successfully created.
  Not creating system devices file due to existing VGs.
  Volume group "vgdemo" successfully created
Verify the creation of the Volume Group as follows.
[user@demo ~]$ sudo vgs
  VG     #PV #LV #SN Attr   VSize    VFree
  vgdemo   1   2   0 wz--n- <100.00g    0
  vgroot   1  10   0 wz--n-   78.80g 6.80g
[user@demo ~]$ sudo vgdisplay vgdemo
  --- Volume group ---
  VG Name               vgdemo
  System ID
  Format                lvm2
  Metadata Areas        1
  Metadata Sequence No  3
  VG Access             read/write
  VG Status             resizable
  MAX LV                0
  Cur LV                2
  Open LV               0
  Max PV                0
  Cur PV                1
  Act PV                1
  VG Size               <100.00 GiB
  PE Size               4.00 MiB
  Total PE              25599
  Alloc PE / Size       25599 / <100.00 GiB
  Free  PE / Size       0 / 0
  VG UUID               zeuQSB-nJGW-fZWq-5Y3L-7v3F-tzkl-8zq8D9
While multiple Logical Volumes can be assigned to a Volume Group, only one Volume Group can be configured on each Virtual Disk.
Creating Logical Volume
After creating the Volume Group, you configure two Logical Volumes. Each Logical Volume should have a size of 50 GB.
[user@demo ~]$ sudo lvcreate -L 50G -n lvapp vgdemo
  Logical volume "lvapp" created.
[user@demo ~]$ sudo lvcreate -l+100%free -n lvdata vgdemo
  Logical volume "lvdata" created.
Use the lvs and lvdisplay commands to verify the configuration.
[user@demo ~]$ sudo lvs
  LV            VG     Attr       LSize   Pool Origin Data%  Meta%  Move Log Cpy%Sync Convert
  lvapp         vgdemo -wi-a-----  50.00g
  lvdata        vgdemo -wi-a----- <50.00g
[user@demo ~]$ sudo lvdisplay /dev/vgdemo/lvapp
  --- Logical volume ---
  LV Path                /dev/vgdemo/lvapp
  LV Name                lvapp
  VG Name                vgdemo
  LV UUID                ZAdoof-i62i-QXHP-lpEn-oPBW-eyNI-tuDIt1
  LV Write Access        read/write
  LV Creation host, time ama-dev, 2025-11-12 17:48:25 +0100
  LV Status              available
  # open                 0
  LV Size                50.00 GiB
  Current LE             12800
  Segments               1
  Allocation             inherit
  Read ahead sectors     auto
  - currently set to     8192
  Block device           253:10
[user@demo ~]$ sudo lvdisplay /dev/vgdemo/lvdata
  --- Logical volume ---
  LV Path                /dev/vgdemo/lvdata
  LV Name                lvdata
  VG Name                vgdemo
  LV UUID                5QrotQ-piLy-Pcm6-DlqD-2Fy8-8gXO-7ukdhe
  LV Write Access        read/write
  LV Creation host, time ama-dev, 2025-11-12 17:48:44 +0100
  LV Status              available
  # open                 0
  LV Size                <50.00 GiB
  Current LE             12799
  Segments               1
  Allocation             inherit
  Read ahead sectors     auto
  - currently set to     8192
  Block device           253:11
Formatting
Before you can use the new Logical Volumes, they must be formatted.
We recommend our standard XFS filesystem. XFS is a high-performance filesystem and offers many advantages:
- High input and output write rates
- Scalability
- Auditing
The mkfs (Make Filesystem) command formats the newly created Logical Volumes quickly.
[user@demo ~]$ sudo mkfs.xfs /dev/vgdemo/lvdata
meta-data=/dev/vgdemo/lvdata     isize=512    agcount=4, agsize=3276544 blks
         =                       sectsz=4096  attr=2, projid32bit=1
         =                       crc=1        finobt=1, sparse=1, rmapbt=0
         =                       reflink=1    bigtime=1 inobtcount=1 nrext64=0
data     =                       bsize=4096   blocks=13106176, imaxpct=25
         =                       sunit=0      swidth=0 blks
naming   =version 2              bsize=4096   ascii-ci=0, ftype=1
log      =internal log           bsize=4096   blocks=16384, version=2
         =                       sectsz=4096  sunit=1 blks, lazy-count=1
realtime =none                   extsz=4096   blocks=0, rtextents=0
Discarding blocks...Done.
[user@demo ~]$ sudo mkfs.xfs /dev/vgdemo/lvapp
# ...
Persistent mounting
The Volume Group and Logical Volumes have been created and formatted. To ensure that your application's data is persistently available, you must mount both Logical Volumes.
First, create the mount points. Mount points are absolute system paths. Make sure not to overwrite any existing mount points.
[user@demo ~]$ sudo mkdir -p /opt/demo/app
[user@demo ~]$ sudo mkdir -p /opt/demo/data
It was mentioned earlier that the order of block devices can change with each boot process. To ensure that the Virtual Machine can connect the Logical Volumes with the block devices at the next boot, you have two methods available:
- Use the system paths of the Logical Volumes, for example /dev/vgdemo/lvapp and /dev/vgdemo/lvdata
- Use the Universal Unique Identifier (UUID)
You can find the UUID of a Logical Volume using the blkid command.
[user@demo ~]$ sudo blkid /dev/vgdemo/lvdata
/dev/vgdemo/lvdata: UUID="26377689-e2d7-49dd-b86f-2845e975a7cc" TYPE="xfs"
Configure the persistent mount points in the system configuration /etc/fstab and add the two lines at the end of the file. To edit the system configuration, you can use one of the supplied text editors (nano or vim).
[user@demo ~]$ sudo vi /etc/fstab
# Logical Volumes  Mountpoint     Filesystem  Mountoptions
/dev/vgdemo/lvapp  /opt/demo/app  xfs         defaults 0 0
UUID="26377689-e2d7-49dd-b86f-2845e975a7cc"  /opt/demo/data  xfs         defaults 0 0
Finally, verify the system configuration and run the mount command.
[user@demo ~]$ sudo mount -va
/opt/demo/app            : successfully mounted
/opt/demo/data           : successfully mounted
Expanding Volume Group
As with creating a Logical Volume, the Volume Group must also be extended first.
[user@demo ~]$ sudo lsblk
sdb                        8:16   0  100G  0 disk
├─vgdemo-lvapp           253:10   0   50G  0 lvm  /opt/demo/app
└─vgdemo-lvdata          253:11   0   50G  0 lvm  /opt/demo/data
sdc                        8:32   0  100G  0 disk
[user@demo ~]$ sudo vgextend vgdemo /dev/sdc
Expanding Logical Volume
After extending the Volume Group with the new Virtual Disk, expand and enlarge the Logical Volume.
[user@demo ~]$ sudo lvextend -l+100%free /dev/vgdemo/lvdata
[user@demo ~]$ sudo xfs_growfs /opt/demo/data
Windows
Partitioning
Enter "Disk Management" in the Windows search and open Disk Management. Alternatively, you can open Disk Management by right-clicking on the Windows logo.
Initializing a new disk
Right-click on the desired disk and select Initialize Disk.
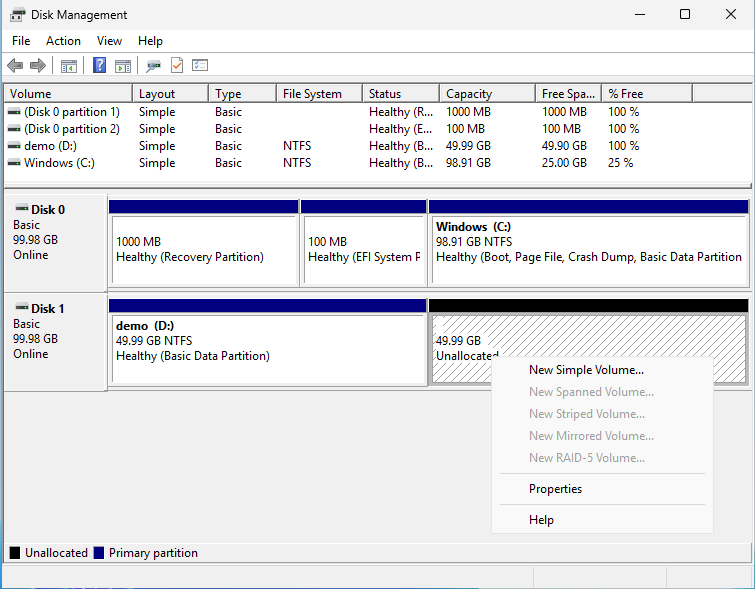
Creating and formatting a partition
Right-click on the free space of the disk and select New Simple Volume. The wizard will guide you through the next steps and create the partition.
Expanding a partition
Right-click on the partition you want to expand and select Extend Volume. The wizard will assist you in expanding the partition.